Keeping a chef's knife sharp comes down to two distinct jobs: honing, which realigns the edge you already have, and sharpening, which removes metal to create a new edge. Confuse the two and you'll either over-grind your blade or hone a knife that's past saving. This guide explains the difference, compares the three most common tools, and walks through a step-by-step whetstone process for a standard, non-serrated chef's knife.
Understanding Knife Maintenance: Honing vs. Sharpening
With regular use, the fine edge of a knife — the microscopic teeth, or burrs, along its bevel — bends and folds over long before it actually wears away. Honing straightens that edge back into alignment, reconditioning the existing cutting surface without removing meaningful material. Sharpening is different: it grinds steel away to form an entirely new edge. Montana Knife Company, whose founder Josh Smith authored the brand's sharpening guide, describes sharpening as creating "a new cutting surface with new serrations," while honing merely realigns the burrs.
Because the two processes do different things, they work on different schedules. Honing is a maintenance task you do often; sharpening is a restoration task you do rarely. Victorinox, the Swiss knife manufacturer, puts it plainly: honing straightens the edge and should be done often, while sharpening restores a dull blade by removing metal and is needed less frequently. Each sharpening pass thins the blade slightly, so a knife that is sharpened constantly will lose steel faster than one that is mostly honed.
The two also work together. Victorinox recommends always honing after sharpening, because sharpening creates a fresh edge and honing smooths and aligns it for better cutting and longer-lasting sharpness. A knife that is only honed will eventually go dull anyway, since realignment cannot restore metal that has worn away — which is why Smith cautions that using a honing rod alone "isn't the correct way to maintain a kitchen knife."
Choosing the Right Tool for Your Knife
Three tools dominate home knife care: the honing rod, the whetstone, and the pull-through sharpener. They are not interchangeable. A honing rod is quick and easy but only realigns an edge; a whetstone removes metal with precision but demands practice; a pull-through sharpener is convenient but, in Smith's assessment, wears out quickly and "doesn't do as good a job as whetstones" because it contacts the blade at only a single point. America's Test Kitchen adds that a whetstone is extremely adaptable — because you hold the knife at the angle the blade requires, it can sharpen any knife type, including knives with a full bolster — but notes it takes practice to master and can take time to restore a very dull blade.
Knife Maintenance Tool Decision Framework
The table below classifies each tool by what it actually does to the blade, how much skill it demands, and when it belongs in your routine. Use it to match the tool to the job: realignment for daily upkeep, metal removal for periodic restoration.
| Tool | Primary Use | Effect on Blade | Skill Level Required | Recommended Use Case |
|---|---|---|---|---|
| Whetstone | Removes metal to create a new, sharp edge | Restores a very dull or damaged edge by grinding a new bevel; adaptable to any knife type, including full-bolster knives | High — requires practice to hold a consistent angle | Periodic sharpening when honing no longer restores sharpness |
| Honing rod | Realigns the microscopic burrs on the existing edge | Reconditions the existing edge without removing significant metal | Moderate — easier than a whetstone, but angle control still matters | Frequent, even weekly or per-session, maintenance between sharpenings |
| Pull-through sharpener | Convenient at-home edge refresh | Single point of contact wears the tool quickly and performs worse than a whetstone, per Montana Knife Company | Low — minimal technique needed | Convenience-focused users willing to accept the trade-offs |
The framework points to a clear division of labor: a honing rod for frequent maintenance and a whetstone for periodic sharpening, with pull-through sharpeners as a lower-skill but lower-performance alternative. Note that some ceramic honing rods blur the line — Smith points out that a very fine-grit ceramic rod can remove a little steel and reset the edge, functioning as a mild sharpener as well as a hone.
Step-by-Step Whetstone Sharpening Guide
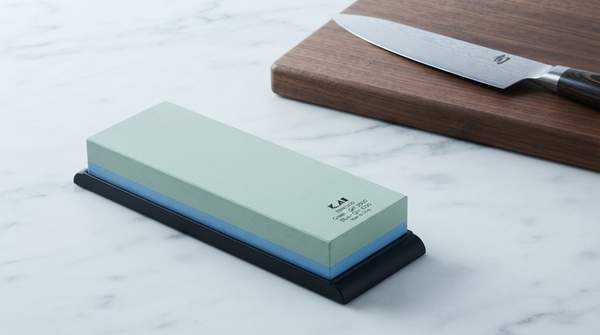
Most whetstones are two-sided, with a coarse side for removing material and a fine side for refining the edge. Smith prefers a combination stone with 1,000 grit on one side and 6,000 grit on the other. Here is the process for a standard chef's knife, synthesized from the guidance of America's Test Kitchen and Montana Knife Company:
- Secure the stone. Place rubberized shelf liner or damp paper towels under the whetstone on your countertop so it cannot slide, with the coarse side facing up, as America's Test Kitchen instructs.
- Establish the angle. Hold the knife at approximately a 15-degree angle to the stone, per Montana Knife Company's recommended method. Consistency matters more than the exact number — the goal is to hold the same angle on every pass.
- Sharpen on the coarse grit. Draw the blade across the coarse side, working one side of the knife at a time, to grind away steel and form the new bevel. A very dull blade will take time at this stage.
- Refine on the fine grit. Flip to the fine side to smooth the edge and reduce the burr left by the coarse pass. On Smith's combination stone, the finer side is where you reset the edge, while the rougher side refines it and reduces the burr.
- Hone the final edge. Finish with a few passes on a honing rod to align the freshly ground edge, following Victorinox's advice to always hone after sharpening.
- Test for sharpness. A properly sharpened knife should cut cleanly rather than tear or snag — a paper slice that comes away clean, without catching, is a reliable home check.
Expect a learning curve. America's Test Kitchen lists the whetstone's main drawback as the practice required to hold the correct angle, and Smith concedes it is not as easy as a pull-through sharpener — but once you learn good form, he argues, a whetstone pays for itself in performance and blade longevity.
Establishing Your Knife Maintenance Routine
How often you hone and sharpen depends on how much you cook and the quality of the knife, so the sources give different rhythms for different users. Smith's rule of thumb for frequent home cooks is sharpening about once a month, with a honing rod session once a week to keep the knife precise in between. Victorinox is more conservative for typical home use: most home cooks need sharpening only once or twice a year, ideally by a professional, with regular honing in between — and occasional users may sharpen even less. Both agree on the structure: hone often, sharpen rarely.
Victorinox adds that with daily use and regular honing, a quality knife can stay sharp for weeks or even months, and that sharpening as needed won't wear a home blade out quickly — the rapid wear seen in heavy-use settings like the meat industry is not a home-kitchen problem. The key discipline is not letting a knife get so dull that honing can no longer help, at which point only metal removal will bring it back.
Maintain Your Edge: A Sustainable Knife Care Routine
Home cooks should adopt a routine of frequent honing and periodic sharpening to ensure their knives remain sharp and safe for use. In practice, that means a honing rod within easy reach of your cutting board, used weekly or whenever the knife starts to feel imprecise, and a whetstone session — or a professional sharpening — when realignment stops working. Adjust the sharpening interval to your own usage: monthly if you cook heavily, once or twice a year if your knife sees occasional use.
The measurable indicator that your routine is working is simple: the knife consistently glides through food with no resistance, and a paper slice test yields a clean, snag-free cut. If the paper tears or the blade catches, hone first; if honing doesn't fix it, it's time for the stone.
Sources
- How to Sharpen a Kitchen Knife Like a Pro — Montana Knife Company
- How to sharpen and hone — Victorinox
- How to Sharpen Kitchen Knives — America's Test Kitchen